Advice for cornering on a motorcycle from Bike Magazine UK and additional suggestion from Eddy Lambah-Stoate author of “My Little Green Book of Advanced Motorcycling”
Corners. It’s what bikes are all about. And along with braking, cornering is the skill that needs to be practised at every opportunity: Ideally, you will need a Standard Corner that is a 90′ bend, recently resurfaced, with plenty of grip, good visibility and no traffic. Get the fundamentals right here and you can apply them anywhere.
Corner Approach.
Easy in theory. For a right-hander, you should be as far over to the left side of your lane as safety allows and, for a left-hander, you should be similarly placed but to the right instead. This gives you maximum forward vision as you approach the turn. In real life, left-handers usually restrict you to your side of the white lines depending on vision and on right-handers, the left gutter is often bumpy and full of rubbish, so already you’re modifying theoretical perfection to cope with real life.
Flick the bike.
You would be surprised how hard you can turn a bike. Ride in a straight line at 50 KpH and gently nudge the left bar away from you. Feel how the bike turns left. Now nudge the right bar. Now slalom. You have just discovered counter-steering. It’s the way to fling a bike on its side where and when you want, providing you have sufficient grip.
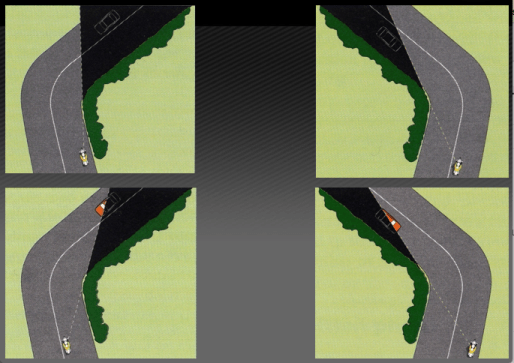
Entry, Apex, Exit.
So the corner is in your sights.. it is a right-hander… where do you start to turn? Tricky that, almost certainly later than you think.
Very few riders turn too late; most turn too early, which means they run wide on the way out of the turn. To work it out, you need to be aware of the three distinct parts that make up every single bend in the world: Entry, Apex and Exit.
To find out where to turn, you have to know where you want to end up on the far side of the comer.
Where you exit a bend depends on what follows it. For our Standard 90′ right-hander let’s assume there’s a following left-hand bend and no nearside dangers. Where we would plan to leave that bend would be back over on the right-hand side of the road on the Exit in order to be ready for the bend that follows it. Draw a curve back from your chosen Exit point just touching the inside of the corner on the right – that’s the Apex of your turn. Continue the line back to intersect your approach. Where the two join is your turn-in point – the Entry. Putting that into practice is easier than it sounds if you have done your homework.
Remember “You Go Where You Look”? Here is where it really earns its keep.
Practice again and again and again. Try different lines on your approach, and get a feel for how to interpret what you are looking at. If it does not gel immediately, park up and do it on foot – the principle is the same. Once you really have the hang of this, you have the basic knowledge to tackle any corner, anywhere in the world. Refinement comes later, but for now, keep practising until it gets dark. Exit, Apex, Entry. Exit, Apex, Entry…
In slow, out fast.
Do you frequently enter bends slightly too fast, just about get through on a completely closed throttle, run wide on the exit, then convince yourself you were on the limit? You can go faster but first, you have to slow down and learn to work the back tire, not the front. The idea is to spend as little time as possible on a neutral or closed throttle but to drive through the corner. Once you get the hang you will find you can use lots of throttle mid-corner, so long as you use it smoothly and there is sufficient grip. Diesel slicks excepted, if you are on the power you are unlikely to lose the front. Which is good because front-end slides are usually terminal, and rear ones (if they happen at all) often aren’t.
Mental sympathy.
Time now to turn our attention to how our body is set on the machine. This can assist the mechanical elements to perform as they should.
Put your machine on its centre stand ( if it has one) sit on the bike hold the handlebars, straighten your elbows – now go to turn the bars without moving your shoulders – you can’t, straight arms and tense stiff shoulders do not help a machine to corner.
Now lean forward and bend your elbows. See if your forearms can get parallel the ground, you will find you can now push the bars from side to side without much of your upper body being involved at all.
You might find, however, you don’t feel quite so connected with the bike, the remedy is to grip the tank a little tighter and feel the balls of your feet on the pegs, this not only gives more empathy with the machine but also lowers your centre of gravity which in turn provides greater stability, it also allows the front suspension to more effectively absorb the road conditions. In short, it settles you and the machine.
When coming into our corner we will already have sorted our position, speed and gear so to make our turn a small pressure on the bar in the direction of the turn will bank the bike over. The bike will now describe a curve, but to help it further, try pointing your inside elbow into the bend, this will cause your inside shoulder to drop which in turn will move your head across. Get in the habit of trying to keep your eyes horizontal to the road as this helps to maintain balance and perspective. All it needs now is to allow that limit point to suck you round with the application of a little gas – and a huge grin should then be apparent under your helmet.
What may be handy now is an environment in which to practice doing things well and the reverse, knowingly doing them badly so we can feel the difference.
The Institute of Advanced Motorists runs rider skills days, combined with instruction, on various race tracks around the country – you don’t have to be a member. It is not about racing but machine control so get on the web site, book and turn up. Alternatively, take a trip to the Picos de Europa in Northern Spain. The mountain circuit of roads is just over 130 miles and contains some 1000 bends of all shapes and sizes -call it a day at school…
Discover more from Thinking One More Mile
Subscribe to get the latest posts sent to your email.